Thursday, May 16, 2013

Tutorial: Lap Size Chevron Quilt

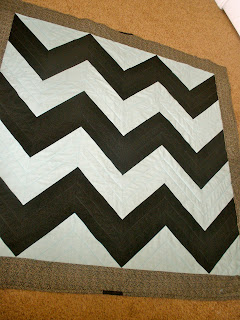
My amazing sister gave me this pattern/idea for this CUTE chevron quilt! Chevron is all the rage these days and with the colors I wanted to use the quilt came out as great as I imagined it to be. My husband even tried to claim it for himself but it was too late! I made this for a wedding present and got inspiration for the colors from the wedding announcement. This looks like white and black but really it's a very light teal with black. (If you click on the pictures you might be able to tell better.)
I made this quilt in a time crunch with two kids on my hands...it can be done!! Just tell yourself to do one step each day and it will be done in 10 days! 


Ok let's get down to it! 

Fabric needed:
- 2 colors of fabric = 60" cut of each (1 yard & 24")
- border fabric if you desire = 30" cut 
- fabric for the back = 4 yards 
- batting = twin size (you'll have to cut it down)

The pattern for this is fairly straight-forward so I didn't take pictures. 
1. Cut your two colors of fabric in to 10" strips, then 10" blocks
2. Take one color and draw a straight line from one corner to the other diagonally. Do this on every square you have for that color
3. Put one of each color square face to face on top of the other and sew 1/4" ON EACH SIDE of the line you just drew from step 2
4. Cut on the line you drew in step 2
5. Open what you have sewn together and iron the seams down
6. Place your blocks to make the chevron pattern and sew them together row by row (make sure to line up the tips of the triangles to make sure your points look spot on after sewing!) You also might have some left over blocks so don't be frightened :)
7. After sewing together the whole chevron print top I added a 5" border. I cut 5" strips, sewed them all together end to end, then sewed on the top and bottom, then sides. 
8. For the back I sewed together the fabric side by side
9. Lay out the back fabric, the batting on top, then the quilt top, & pin it. To sew through the quilt I measured 2.125" (it's half of 1/4") from the chevron print and marked it with chalk. Do little bits at a time so the chalk doesn't disappear and you have to mark it again!
10. For the binding I folded to the front the back fabric...so much faster! However I wouldn't say the quality is as great as putting on normal binding.

This is the best picture I got...guess I better try harder next time!!


Friday, November 30, 2012

Tutorial: Headband Holder


I was officially tired of trying to stuff all of my little girl's headbands into a bathroom drawer, when I thought of making one out of an oatmeal container. And yes, there are other ways to make headband holders, but I didn't want to spend any money! My directions are a bit vague but this is pretty much self-explanatory with the pictures. If you have additional questions just comment below. 

So here's how I did it:
Supplies: Oatmeal container, hot glue gun, fabric scissors, piece of cardboard, ribbon, and half yard of fabric 


 1. Lay out your fabric and leave some extra on the ends, then cut. 

2. Put some hot glue on the fabric end and stick it to the oatmeal container.  

3. Wrap the fabric around and glue it to the container again. I folded the end so there wouldn't be a raw edge that could potentially fray. 

4. While you have your hot glue out, wrap fabric around your cardboard square. This is to keep your container from rolling around. I also thought of putting something heavy inside your container before you wrap it so if you want that option scratch this idea :) 

5. Hot glue the cardboard piece to the bottom of the container. I put it right on the seam.  

6. Now tie the ends with ribbon like a piece of candy. I did little bows. 


There you have it, a headband display! 

Friday, October 5, 2012

Quick & Cheap Halloween Decor

Witch's Brew!


I got this witch's caldron from JoAnn's, on sale, for $1.49. It's original use is for candy on Halloween night but I needed to fill it up until then. (Let's face it, if it was full of candy it wouldn't stay filled until Halloween!)
So what looks like witch's brew? Ripped up batting! I always have batting leftover from quilts that I keep around for such occasions. I got my daughter involved too, and she loved it. I'll bet you could use batting for spider's webs, too! 

Anyway, let your imagination run wild with options. 


Thursday, October 4, 2012

Quick Baby Quilt

I don't have a ton of time on my hands with two kids, but I have enough time to make a cute baby quilt like this! 
 I made this by cutting fabric into 2 1/2" strips, sewing together three strips, then cutting those into 4" blocks (looks like a rectangle). Put blocks together end-to-end and you make one long block like the three above! Add some 6" sashing and whala! A quilt :) For the back, I put soft cozy fabric (like baby flannel). I DID NOT put batting in this quilt because mommy's want blankets to easily wrap around their babies! With the thickness of the back fabric and it's softness it will be just fine without batting. I wouldn't recommend that option for quilts using 100% cotton fabric/quilting fabric.

Monday, June 18, 2012

Tutorial: Car Seat Canopy With Elastic

A car seat cover with elastic is great for cold or windy weather. I sell these at my etsy store (Itty Bitty Fashion) but if you want to make your own, I am happy to share the steps I took! 


STEPS:
1. Cut top & bottom fabric 45 1/2" x 35 1/2"


2. Place the fabrics right sides together, place a cutting mat under each corner, take a paper plate, and cut the corners around the side of the paper plate.

Here's what the corners will look like after you cut. Stick a sewing pin in each corner to hold the two fabrics together.

3. Sew around the edge and leave a 5" opening. Seams are 1/4".

4. Cut slits into the corners (but not past where you've sewn). This allows the fabric to curve better when turned inside out.

5. Now turn the cover inside out and where your opening is start sewing 1"-1 1/2" from the edge. This is to create a pocket for your elastic so make sure it will be enough room for your elastic to thread through. Go all the way around. 

 5 1/2. Yes this is a half step :) I put my straps on after I did the elastic to make sure they were in the right spot, but I would suggest doing your straps at this point. See steps 10-13. Aren't you glad you can learn from my mistakes?!

6. Take your 1/2" or 3/4" elastic (I used 2 yards and then trimmed what was left) and put a safety pin through it. 

7. Thread your elastic all the way around and pull it tight to your liking. I cut my elastic and ended up using about 4 feet total, just in case you're making this for someone else!

8. To connect the two ends of my elastic I used my serger. If you don't have a serger, overlap the two ends and sew through & back a couple of times to ensure it holds. 

9. Now you can sew the opening. Fold in your fabrics so no raw edges are showing and make sure not to sew over the elastic. 

 10. Now for the straps. Fold them right sides together hot dog style (length wise). Sew around one short edge and along the long edge with a 1/4" seam. 

11. Trim the corners.

12. Turn the straps inside out, fold the fabric in on the one edge you didn't sew, start there and sew around the edges with a 1/4" seam. Sew again over the short edge when you come back around to ensure a strong hold. 

13. Place your straps on your carseat cover at 16" down and 12" across. I did a square with an X.