Showing posts with label tutorial. Show all posts

Thursday, May 16, 2013

Tutorial: Lap Size Chevron Quilt

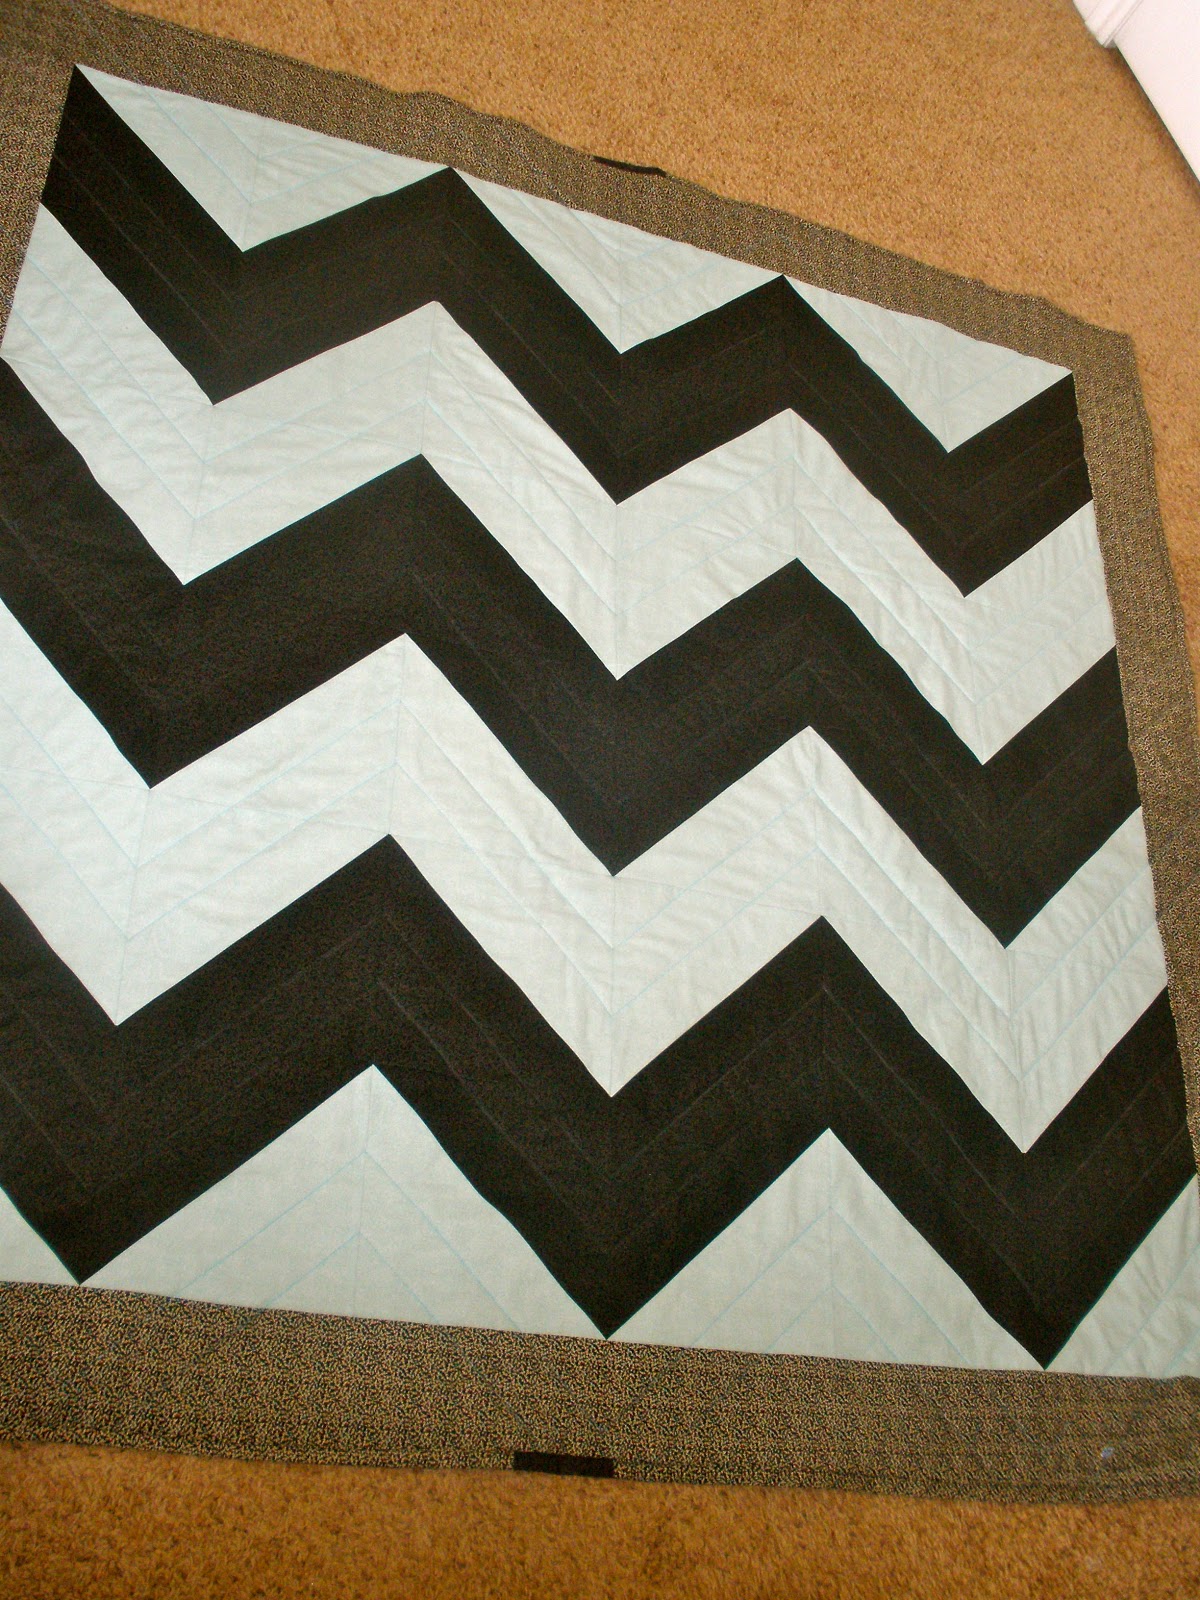
My amazing sister gave me this pattern/idea for this CUTE chevron quilt! Chevron is all the rage these days and with the colors I wanted to use the quilt came out as great as I imagined it to be. My husband even tried to claim it for himself but it was too late! I made this for a wedding present and got inspiration for the colors from the wedding announcement. This looks like white and black but really it's a very light teal with black. (If you click on the pictures you might be able to tell better.)
I made this quilt in a time crunch with two kids on my hands...it can be done!! Just tell yourself to do one step each day and it will be done in 10 days! 


Ok let's get down to it! 

Fabric needed:
- 2 colors of fabric = 60" cut of each (1 yard & 24")
- border fabric if you desire = 30" cut 
- fabric for the back = 4 yards 
- batting = twin size (you'll have to cut it down)

The pattern for this is fairly straight-forward so I didn't take pictures. 
1. Cut your two colors of fabric in to 10" strips, then 10" blocks
2. Take one color and draw a straight line from one corner to the other diagonally. Do this on every square you have for that color
3. Put one of each color square face to face on top of the other and sew 1/4" ON EACH SIDE of the line you just drew from step 2
4. Cut on the line you drew in step 2
5. Open what you have sewn together and iron the seams down
6. Place your blocks to make the chevron pattern and sew them together row by row (make sure to line up the tips of the triangles to make sure your points look spot on after sewing!) You also might have some left over blocks so don't be frightened :)
7. After sewing together the whole chevron print top I added a 5" border. I cut 5" strips, sewed them all together end to end, then sewed on the top and bottom, then sides. 
8. For the back I sewed together the fabric side by side
9. Lay out the back fabric, the batting on top, then the quilt top, & pin it. To sew through the quilt I measured 2.125" (it's half of 1/4") from the chevron print and marked it with chalk. Do little bits at a time so the chalk doesn't disappear and you have to mark it again!
10. For the binding I folded to the front the back fabric...so much faster! However I wouldn't say the quality is as great as putting on normal binding.

This is the best picture I got...guess I better try harder next time!!


Friday, November 30, 2012

Tutorial: Headband Holder


I was officially tired of trying to stuff all of my little girl's headbands into a bathroom drawer, when I thought of making one out of an oatmeal container. And yes, there are other ways to make headband holders, but I didn't want to spend any money! My directions are a bit vague but this is pretty much self-explanatory with the pictures. If you have additional questions just comment below. 

So here's how I did it:
Supplies: Oatmeal container, hot glue gun, fabric scissors, piece of cardboard, ribbon, and half yard of fabric 


 1. Lay out your fabric and leave some extra on the ends, then cut. 

2. Put some hot glue on the fabric end and stick it to the oatmeal container.  

3. Wrap the fabric around and glue it to the container again. I folded the end so there wouldn't be a raw edge that could potentially fray. 

4. While you have your hot glue out, wrap fabric around your cardboard square. This is to keep your container from rolling around. I also thought of putting something heavy inside your container before you wrap it so if you want that option scratch this idea :) 

5. Hot glue the cardboard piece to the bottom of the container. I put it right on the seam.  

6. Now tie the ends with ribbon like a piece of candy. I did little bows. 


There you have it, a headband display! 

Monday, December 19, 2011

Tutorial: 10 Minute Fleece Pillow

Here's an incredibly simple, inexpensive, no-sew pillow to make! I made one for my almost 2 year-old daughter and she LOVES it because it is so soft. 


What You'll Need:
-3/4 yard of fleece
-Pillow form 14" x 14"
-Fabric scissors

 Steps:
1. Take your pillow measurements (I say it this way because you may want a bigger/smaller pillow form than I used) and add 6 inches to those numbers.

2. Fold your fleece fabric in half but don't worry about using the folded edge. Cut those two layers in a square with the measurements you came up with in step 1. 

3. Cut strips into the edges of your fleece about 4" in depth and about 1" in width. Cut out the corners as you go. 

4. Put your pillow in-between the two pieces of fleece and start tying them together. I used square knots. 

You're done! Enjoy!

Tuesday, November 8, 2011

Tutorial: Thanksgiving Banner


In trying to make my own Thanksgiving decor, here's a banner I made to hang on the wall. I only spent $0.74 on the burlap since I already had the other supplies!

Supplies:
4" Cut of Fabric (for the letters)
1/4 Yard of Applique
1/4 Yard of Burlap
1 1/2 Yards of Ribbon

Here's how I made it:
1. I grabbed a fabric I liked and ironed on applique to the wrong side. 
2. In Microsoft Word, I used "American Typewriter" font, size 250, and in Text Effects I picked an outline of the font for easy cutting. 
3. Trace the letters backwards onto the applique and then cut them out.
4. I also made my triangle shape in Microsoft Word using the Shapes button.
5. Then I cut out the burlap using my triangle pattern and sewed a 1/4" seam around the edges of them to prevent fraying. 
6. Peel off the applique and iron on the letters to your burlap.
7. Cut 1" straight lines into your triangles for the ribbon to go through.
8. String through the ribbon and you're done! 

Tuesday, November 1, 2011

Tutorial: Scrappy Thanksgiving Wreath

This Thanksgiving wreath is quick and easy to make, especially if you have a lot of scrap fabric! I wanted to decorate for Thanksgiving but didn't want to spend any money, so this is what I came up with: 


All you need is a hanger, fabric scraps, and fabric scissors.

1. Start with your hanger, bending it into a circle.

2. Cut your fabric into strips - I used different widths but kept the length at a foot.

3. Tie your fabric onto the hanger in square knots (right over left, left over right). Switch between colors in a random order and continue until your wreath is complete.

Feel free to trim up your fabrics if you want, and you're done!

Monday, September 26, 2011

Tutorial: Crib Dust Ruffle

I couldn't believe how quickly I was able to make a dust ruffle for my soon-to-be baby's crib. Now I'm contemplating making one for my king size bed! Oh boy. 


Forgive me for not having step-by-step pictures, but really this is a VERY simple and straight-forward tutorial.

Supplies Needed:
2 yards of fabric for underneath the mattress
3 yards of fabric for your dust ruffle (about 3 times the length of your crib sides)
*These measurements are based on a standard size crib*


Steps:
1. Cut your fabric for underneath the mattress 28" x 50".

2. Cut your ruffle fabric 3 times the length of the side it will be sewn on to. I first cut strips of 12 1/2", then made them 150" long for the two sides. For the short side of the crib I did 12 1/2" x 84".

3. I hemmed each panel of my ruffle fabric by doing a rolled hem on my serger. I did this to the short sides and one long side to prevent any fraying. 

4. Ruffle the remaining long side.

5. Sew your ruffle fabric onto the other one (right sides together). I did a rolled hem again on my serger.  With each panel, leave an extra 3 inches on each side to sew to the next panel so you have extra coverage on your corners. 

Done! Enjoy your incredibly cute and custom-made dust ruffle! 

Monday, September 19, 2011

Tutorial: Crib Sheet

Pardon my absence of posts lately, I just moved and all sewing projects were on hold. It about killed me not to sew for this long - mostly because I am excited to make my own crib bedding for my new baby girl due this Christmas! 
First on my list was a crib sheet. It was SO easy! If you want a special fabric print or custom color, I would suggest making your own. If you just want a basic one color sheet, I hear Wal Mart has those for $4.00 which would be worth your money and time to get. 


Supplies Needed:
2 yards of fabric
2 pieces of 1/4" wide elastic - 23" long each

Steps:
1. Cut your fabric 40-45" x 69" (The 40-45" is open to whatever the width of your fabric is when you purchase it. Your sheet will fit as long as it is within those measurements)

2. Now remove (cut off) an 8"x8" square from each corner.

3. On each cut out corner, fold the cut edges together with the fabric right sides together. 

4. Now serge those together. 

Here is what it should look like (I did a rolled hem because really it doesn't matter to me!):
 *If you would like for your sheet to fit the mattress in a "more snug" fashion, sew a line from the bottom of where the diagonal starts (in the left side of this photo) up to your sewn edge with a more gradual incline. 

5. Place your sheet right side down. Go all around and fold your fabric edge in 3/4", 

then fold it again about a 1/2" and pin. This is to make sure no raw edges are showing so you don't have any fraying when washing your sheet. 

6. Before sewing, make a mark of an inch long 8 1/2" before one corner and 8 1/2" after the next corner on each short side of the sheet. You'll have four marks each and you'll leave these open to insert your elastic.

7. Sew around the perimeter of your folded edge. I only left about a centimeter of folded fabric to secure the fold down as well as leave enough room to thread my elastic through the inside. 


8. Insert your elastic into one opening and thread it through to the other opening. I pinned my elastic to a small safety pin to help thread it through. 

9. Once your elastic is threaded through, sew over it diagonally a couple of times and then sew that opening shut. 

You're done! Congratulations!


Monday, August 29, 2011

Tutorial: 5 Step Baby Car Seat Strap Covers


Car seat strap covers are so quick and easy to make! Plus you can make these a custom design by choosing your own fabric. It takes less than an hour to make, so get started! If you use two different fabrics, you've got yourself reversible strap covers. I have used this size of strap covers with my daughter's infant car seat and now with her convertible car seat. 


Steps

1. Cut out two 6"x6" squares of each fabric and two pieces of batting the same size. 

2. Put your fabrics right sides together with the batting on top or bottom (it doesn't matter). Sew these together with a 1/4" seam. Leave a 2" opening to turn inside out. 

3. Cut your corners & turn the square inside out.

4. Pin your opening and sew around the outside of the square still with a 1/4" seam. I started sewing at the beginning of the opening and then went over it again at the end as a form of double stitching/reinforcement. 

5. Cut 2 strips of velcro approximately 5" long. Sew those on one side to each side of the square by sewing around the perimeter of the strips. Here are my two strap covers showing a velcro strip on each side. Excuse the fact that my velcro strips aren't the same color, I ran out of the white velcro with my first strap cover! Who will really see it, right?? As a side tip, I put transparent thread on the top stitch so it wouldn't show on the velcro. White thread would work as well. 

You're all done! Enjoy your cute strap covers!

Saturday, June 18, 2011

Cont'd Tutorial: Adding a Tab to Your Purse


1. Make a U shaped pattern - 3 inches wide. Cut two pieces. Place the metal piece down on one cut and mark where those two rectangular holes are. 

2. Fold your fabric and cut on the two marks you just made. Now you can slide your metal piece through. 

3. This isn't a requirement but I do it to reinforce the magnet on the tab: Do the same steps you just did but now with the cardboard and slide that into place. You'll see here also I put interfacing on the wrong side of the fabric. 

4. Now you can put on the metal back piece. 

5. Bend out the magnet prongs to secure it into place. 

6. Place the two pieces of fabric right sides together and sew around the U shape but leave the top open. Remember to backstitch.

7. Turn the tab inside out.

 8. Sew a small line around the tab if you like. 

9. When putting the tab in, place it between the two layers of the purse. Have it stick out a good 1/4" so it is securely in place when sewn. For the purse, I put the inner lining inside the outer and right sides together with the magnet facing down on the tab. 

10. On the other side of the purse's outer lining, put the other side of the magnet in about an inch and a half down from the purse's top. 

(Outer lining with magnet finished):

Here's a closer view of the purse! The tab is (obviously) there on the top but it does blend in a little with this fabric design!

Friday, June 17, 2011

Sling Purse Tutorial

This is a "make-your-own" sling purse pattern! It's not hard to make though, so don't worry. I'll guide you through each step. This is the only picture I got of the finished purse - I was paid to make it and delivered it without taking more photos! Sorry for that. 


Supplies:
2 yards fabric (makes outer and inner lining of purse, plus a cell pocket on the strap if desired)
1 yard interfacing 
1/2 yard fabric for inside pockets if desired

To make your pattern: the sling or strap part of the purse is 3 1/2" x however long you want the strap to be. To find this out, have someone help you measure from your hip to around your shoulder and at the same hip again. Cut that measurement in half and that's how long you'll make your strap when cutting. 
For the body of the purse, I did 17"x16" but again you can decide how big or small you want this to be. From the strap to the edge of the purse my measurement is 4.5". Just make sure the strap is in the middle and build your measurements around that. I made my pattern out of rolled up paper and yes you need to make sure the strap is connected to the purse when cutting your fabric! Okay, not to bad right?

 1. Fold your fabric length wise and place the pattern down farthest from the fold. 

(A second example of laying out your pattern)

2. Right here on your pattern make a diagonal line connecting the strap to the purse if you'd like the curved look in your purse. (That's what I did) The next picture shows my diagonal lines better. Now cut out your pattern and you'll end up with two of the same cut-outs. Do this again to make your cuts for your lining. (I flipped the pattern around and cut it that way)


3. Let's start on the pockets! Cut on the fold a 12 1/2" x 11"  pocket & a 6 1/2" x 12 1/2" pocket. For each pocket, place the right sides together and sew leaving about 3" open to pull it inside out. Then iron the pockets down and fold in the open seam so it is hidden. 

4. On the fold of the pocket, sew across the top only. This is the top of the pocket and WON'T be sewn down. Now take a break from the pockets.

5. Cut out your interfacing and iron it onto the wrong side of the inner lining pieces. You don't have to cut the strap and purse in the same cut on this one. 

6. Sew the right and left sides of the outer fabric top to bottom. Right sides together.

7. Now put the side seams in the middle like this and sew the bottom of the purse. 

Here is the bottom sewn:

8. Take the corners of what you have just sewn and put the bottom seam in the middle to make a triangle. Now sew a straight line down about 1 1/2" in on each side. Trim the seam. 


 9. Repeat steps 6-8 to make your inner lining. However, when you sew the bottom on step 7, leave a 3" opening which you'll need later.

10. Now, pin your pockets where you want them onto the lining of the purse. You'll pin them so the middle is over the seam and the straps are on the sides (to give you a point of reference).  Put the side where you have already sewn a line across at the top. Sew in your pocket...only on 3 sides though! :) If you want to make pockets within your pocket - sew from the top to the bottom of the pocket and remember to backstitch.

 11. If you'd like a cell phone pocket, I cut on the fold a 3 1/2" x 6 1/2" pocket, put right sides together, sewed together the 3 1/2" side that isn't the fold, sewed a line across the fold, and pinned it on the strap of the outer fabric about 6" up from the curve from the purse. (The 6 1/2" sides are NOT sewn at this point) Go ahead and sew on to the strap the bottom of the pocket. 


12. I put a magnetic tab on this purse and I'll post "how to" directions tomorrow on this. Otherwise my tutorial might scare people away! :) The tab isn't hard, but I don't want too many steps at once! 


13. Place the inner purse inside the outer purse, right sides together. Pin the seams to match up. This is where you will pin in your tab, with the magnet facing down, in between the two seams. 

14. You'll place the other magnet on the outer fabric about an inch and a half from the top of the purse. Now you can pin the two seams on that side of the purse together. 

 15. Now sew all around the edges up to and around the top of the straps. Remember the opening you left in the lining? This is where you'll pull the purse inside-out. 

 16. Once your purse is turned inside-out, sew shut your opening in the lining. I did this by folding the raw edges in and sewing across. 

17. To put the straps together, I overlapped them about a half inch and sewed a straight line one way, and then another right back. Then I did the same thing again on the other side to make sure the straps were securely down. 

(sewing the straps together):

18. Last step: sew around the whole top of the purse and the straps to make a nice polished purse! 

Again, the finished product!