Showing posts with label quilt. Show all posts

Thursday, May 16, 2013

Tutorial: Lap Size Chevron Quilt

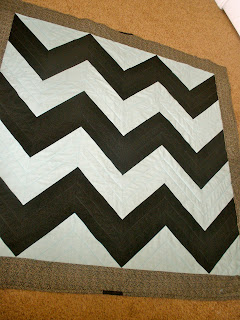
My amazing sister gave me this pattern/idea for this CUTE chevron quilt! Chevron is all the rage these days and with the colors I wanted to use the quilt came out as great as I imagined it to be. My husband even tried to claim it for himself but it was too late! I made this for a wedding present and got inspiration for the colors from the wedding announcement. This looks like white and black but really it's a very light teal with black. (If you click on the pictures you might be able to tell better.)
I made this quilt in a time crunch with two kids on my hands...it can be done!! Just tell yourself to do one step each day and it will be done in 10 days! 


Ok let's get down to it! 

Fabric needed:
- 2 colors of fabric = 60" cut of each (1 yard & 24")
- border fabric if you desire = 30" cut 
- fabric for the back = 4 yards 
- batting = twin size (you'll have to cut it down)

The pattern for this is fairly straight-forward so I didn't take pictures. 
1. Cut your two colors of fabric in to 10" strips, then 10" blocks
2. Take one color and draw a straight line from one corner to the other diagonally. Do this on every square you have for that color
3. Put one of each color square face to face on top of the other and sew 1/4" ON EACH SIDE of the line you just drew from step 2
4. Cut on the line you drew in step 2
5. Open what you have sewn together and iron the seams down
6. Place your blocks to make the chevron pattern and sew them together row by row (make sure to line up the tips of the triangles to make sure your points look spot on after sewing!) You also might have some left over blocks so don't be frightened :)
7. After sewing together the whole chevron print top I added a 5" border. I cut 5" strips, sewed them all together end to end, then sewed on the top and bottom, then sides. 
8. For the back I sewed together the fabric side by side
9. Lay out the back fabric, the batting on top, then the quilt top, & pin it. To sew through the quilt I measured 2.125" (it's half of 1/4") from the chevron print and marked it with chalk. Do little bits at a time so the chalk doesn't disappear and you have to mark it again!
10. For the binding I folded to the front the back fabric...so much faster! However I wouldn't say the quality is as great as putting on normal binding.

This is the best picture I got...guess I better try harder next time!!


Thursday, October 4, 2012

Quick Baby Quilt

I don't have a ton of time on my hands with two kids, but I have enough time to make a cute baby quilt like this! 
 I made this by cutting fabric into 2 1/2" strips, sewing together three strips, then cutting those into 4" blocks (looks like a rectangle). Put blocks together end-to-end and you make one long block like the three above! Add some 6" sashing and whala! A quilt :) For the back, I put soft cozy fabric (like baby flannel). I DID NOT put batting in this quilt because mommy's want blankets to easily wrap around their babies! With the thickness of the back fabric and it's softness it will be just fine without batting. I wouldn't recommend that option for quilts using 100% cotton fabric/quilting fabric.

Friday, February 10, 2012

For Loved Ones Lost

Upon hearing about friends and family losing loved ones, I tried to think of something I could do for them that would last longer than flowers. The thought came to me of making a small quilt with any type of star pattern on it to remind them of heaven. 
Here are a few of the quilts I've made (from the same pattern actually):


Thursday, January 12, 2012

Crazy 8 Christmas Quilt


I know, I know, it's not December anymore, but I worked really hard to get this done and had just the binding to do when I felt too pregnant to do anything at all! Now that my baby is here and I can bend at the waist, the quilt is finished! 
The panel in the middle is called the Crazy Eight Reindeer Panel. I made the star blocks, added a "twist" to the picture blocks that also came with the panel, and added a border
Anyway, I love it and can't wait to display it next Christmas! 

Monday, August 23, 2010

The Yardage Card

When this card was handed to me, I decided I must share it! It's called "The Yardage Card", and as you can see it is put together by Quilters Newsletter. 

It is pretty self-explanatory, simple, and packed with information to hold in your wallet for a quick look when you're at the fabric store. The "How to Seam" figure indicates where to join fabric for the backing on each different size of quilt. 
If you'd like for this information to be in your wallet, simply click on the picture to print it out. 

Thursday, August 19, 2010

Chenille Quilt

Do you want a quick, easy, and beautiful quilt to make? I've got the pattern for you! It's a chenille quilt. I have two of my own and I receive endless compliments on them. 


Here's the quick tutorial: 
1. Purchase up to six different flannel fabrics (I buy baby flannel) at 1 1/2 yards each.
Tip: Buy mostly for the overall color, not necessarily the design as it won't be seen except on the back of the quilt & a little bit on the front but I'll explain that later.
2. Layer your fabrics - the first face down, the second face up, the third face down, then how ever many layers you'd like to do on top of that with the face up.
3. Now you can mark a 45 degree angle on either side (top or bottom). 
4. Now sew each 45 degree angle line - I use 3/4 inch masking tape as my width so if you tape the quilt at a 45 degree angle you would sew in between each strip. Just do a straight stitch here & start in the middle, working your way out on each side.


5. Now straighten out and trim each of the sides so all fabrics are the same length on the edges.
6. Cut all layers (but the two on the bottom) in-between each of your sewn lines. See how the second to last layer shows up more? That would be one fabric that you'd want to take the design into consideration.
7. Sew on your binding, and you're done!


As always, let me know if you have questions or comments - I love to hear from you!

Monday, July 19, 2010

3 Stripes & You're Out!

I finished this quilt for a friend of mine who hopes to someday soon have a baby! (I'm hoping for sooner rather than later, but that's another story!) Anyway, for a simple quilt project or even a scrappy quilt project, this is a good block to do. 

1. Cut strips (the longest length of the fabric) at 2 1/2" wide.
2. Sew three strips together (hence the "three stripes")
3. Then iron down and cut the three strips at 6 1/2" or measure your width to make a perfect square. 
**Remember to square up all of your blocks to the smallest one so everything lines up!**


For my own personal thoughts - the colors in this quilt ended up being borderline "crazy"! I thought it would come out cuter in a sense, but I still like these colors of children's fabric. What do we think? 

Friday, June 25, 2010

Binding

Here are the steps I follow to bind a quilt:
(A walking foot works nicely for this task)

1. Cut your binding fabric in 2 1/2" strips, sew strips together end-to-end, iron in half wrong sides together.
2. Place the folded fabric onto the BACK of your quilt with the raw edges on the edge of the quilt, place it about 6 inches from a corner, & start sewing with the fabric lined up to the edge of your binding about 6 inches down. A little trick I like to do is put in for your bobbin thread a color that matches the top part of your quilt because then when you are folding over the binding and it accidentally doesn't cover up your stitch (this will make more sense later) then at least the stitch is slightly camouflaged!
3. At the corner, sew all the way down to the edge, lift up the pressure foot (I don't cut the thread at all during this process) and fold your binding so it is parallel with your quilt like below:
3a. Then hold your fabric there while folding the binding back over.
3b. Put your needle down into your quilt & binding about 1/4" from each side.
3c. Put your pressure foot back down and start sewing again!
4. Once you've returned back to where you started, trim your binding to overlap a bit.
4a. Fold down your binding on one edge.
4b. Tuck in the other edge of your binding into the folded one (this prevents any raw edges so your binding doesn't fray). Sew over that and at least 3 inches over your beginning stitch.
5. Now you're ready for the LAST step! Turn your quilt over and simply fold the binding. All you have to do is sew! I like to do a decorative stitch here because it is more forgiving for crooked sewing, it covers more surface area to connect the binding to the quilt, and it can add a good "cute" element to a quilt!

Good luck in all of your binding endeavors! Are there binding tips that work well for you? If so, do share! That is the purpose of my blog after all! (Hope you don't mind all of the exclamation marks, it tends to be my favorite punctuation).

Thursday, June 3, 2010

Quilt #1

Here is a simple quilt for you to start on! I made this quilt out of scraps but if you want to purchase new fabric for it I'd get 1/3 of a yard of each. Use 1/4" seams while sewing. I grouped the fabrics randomly so there is no rhyme or reason to where they are placed!

1. Cut your fabric for the blocks into strips that are 2 1/2 inches wide. The lengths will vary if you are using scrap fabric but it is best to just make the longest cut you can.

2. Sew together your strips in sets of three. You'll use these for the long strips down the side of the block as well as one set on each side of the middle three strips. (The middle three strips have that white square of fabric so there's no short cut to making those!)

4. Now cut 6 rectangular 3-strip sets 18.5" long.

5. Do the same type of cut in step four 12 times and this time only 6.5" long.

6. Cut individual strips of fabric into
a) 12 single strips 2.5" x 6.5"
b) 6 single strips 2.5" x 4.5"
c) 6 squares 2.5" x 2.5"

7. Sew together from step six B and C to make what we'll call D!

8. Sew together from step six A to D, then D to A again. That will make the middle three strips in the block.

9. Now sew together your strip sets from steps 5 & 8. Basically you sew one 6.5" long set to the middle strips you made in step 8, and then sew that to another 6.5" long set. (I apologize for the lack of pictures but I already made this quilt before making this blog!)

10. Sew step 9 to step 4. Repeat steps 9 & 10 until all of your blocks are finished! Remember to measure all of your blocks and make all of them equal to the size of your smallest block.

11. The inner border (brown fabric) is 5.5" wide with various lengths. Cut first 6 strips 18.5" long. Then sew those to your blocks. It will be like this: brown strip sewn to a block, then brown again with a block, etc.

12. The top, middle, and bottom strip of brown fabric measures 5.5" x 58.5" (This second measurement may vary due to the actual size of your blocks so just cut off any excess material if needed).

13. As for the binding, I usually use (as I did on this quilt) leftover fabric. Sew together end to end your leftover fabric strips that are 2.5" wide. Iron the seams, then iron the long strip folded in half with the back sides together. I plan to go over binding a quilt soon so I'll explain the process at that time!

Good luck and I promise this is much simpler to make than it is to write down all the steps! So take it one step at a time and if you have any questions write it in the comments section and I'll get back to you ASAP!